Tips for Documenting Roof Damage for Insurance in Minnesota
When a storm hits or a tree falls, the last thing homeowners want to think about is insurance paperwork. However, documenting roof damage correctly can make all the difference when it comes to filing a successful insurance claim. In Minnesota, certain rules and procedures can help ensure that you’re properly covered for any roof-related incidents. Here’s what you need to know.
Step 1: Understand Minnesota’s Insurance Requirements
In Minnesota, most homeowners’ insurance policies cover damage caused by storms, hail, wind, or falling objects such as trees. However, the coverage for the cost of repairs largely depends on the policy specifics. Minnesota law requires that claims for damage be filed within a reasonable amount of time after the incident occurs. Some policies may have a statute of limitations, so check your policy for specific time frames.
Step 2: Start by Documenting the Damage Immediately
After ensuring your home is safe, your first step is to take clear and comprehensive photos of the roof damage. Include wide shots of the roof and close-up photos of any visible issues like missing shingles, punctures, or debris. It’s also important to:
- Use timestamps on photos: Minnesota insurance adjusters often require proof of when the damage occurred. Most smartphones will automatically do this, but make sure the settings are enabled.
- Document from multiple angles: Take photos from ground level and, if safe, a ladder or drone.
- Capture the environment: Minnesota weather can be unpredictable, so be sure to document the conditions during and after the damage occurred (e.g., fallen trees, snow, hail).
Step 3: Write a Detailed Incident Report
Beyond photos, write down the events leading up to and following the incident. Include:
- The date and time of the event.
- Weather conditions before and after the damage (e.g., severe winds, heavy snowfall).
- Any actions you took to mitigate further damage (such as placing a tarp).
Step 4: Preserve Evidence for the Insurance Adjuster
Insurance companies in Minnesota may send an adjuster to evaluate the damage, so avoid making permanent repairs until after the inspection. However, it’s wise to take temporary measures, such as placing a tarp, to prevent further damage. Keep any receipts for temporary repairs, as these can sometimes be reimbursed.
Step 5: Be Aware of Minnesota’s “Right to Repair” Laws
Minnesota homeowners have the right to choose their own contractor for repairs. Your insurance company might suggest certain contractors, but you’re not obligated to use them. At Right Now Roofing, we frequently work with insurance companies to ensure repairs meet all necessary requirements.
Comparison Chart: Roof Damage Documentation Tips
| Documenting Step | Why It’s Important | Best Practices |
|---|---|---|
| Photographs | Proof of damage and timing | Take wide shots and close-ups, use timestamps |
| Incident Report | Provides context for insurance | Include weather details and the sequence of events |
| Temporary Repairs | Prevent further damage | Use tarps, keep all receipts for reimbursement |
| Preserving Evidence | For adjuster evaluation | Don’t make permanent repairs until after inspection |
FAQs
1. What type of roof damage is typically covered by insurance in Minnesota?
Most policies cover damage from storms, wind, hail, and falling debris. However, pre-existing damage or damage due to poor maintenance may not be covered.
2. How long do I have to file a claim in Minnesota?
While most policies don’t have a strict deadline, it’s advisable to file as soon as possible after the damage occurs to avoid complications.
3. Can I choose my own contractor for repairs?
Yes, under Minnesota’s “Right to Repair” laws, homeowners can choose their own contractor for roofing repairs.
4. Should I make temporary repairs before the adjuster arrives?
Yes, temporary repairs like placing a tarp can prevent further damage. Just be sure to document everything and keep receipts.
By following these tips, you can ensure a smoother insurance process and get your roof back to its best condition. If you need help with roof repairs or have questions about documenting damage, feel free to reach out to us at Right Now Roofing.
Sources:
Minnesota Insurance and Documentation Requirements: Homeowners in Minnesota typically need to document storm-related roof damage carefully to ensure successful insurance claims. Minnesota insurance policies generally cover damage from natural events like wind, hail, and falling trees. Homeowners should take photos with timestamps and provide detailed documentation. Always ensure any temporary repairs are documented and receipts kept for insurance reimbursement(
A. Fricker Roofing and Waterproofing
FEMA Guidelines on Hazardous Trees: If the damage involves hazardous trees, such as large branches or fallen trees, FEMA guidelines may apply if the event was declared a disaster. FEMA typically covers the removal of hazardous trees larger than six inches in diameter if they pose an imminent threat(
Justin Hansen is a seasoned professional in the roofing and siding industry, boasting over 15 years of hands-on experience. Starting his career in residential roofing, Justin quickly established a reputation for meticulous attention to detail and superior craftsmanship. His commitment to quality and excellence propelled him into more complex commercial projects, where he consistently delivered outstanding results.
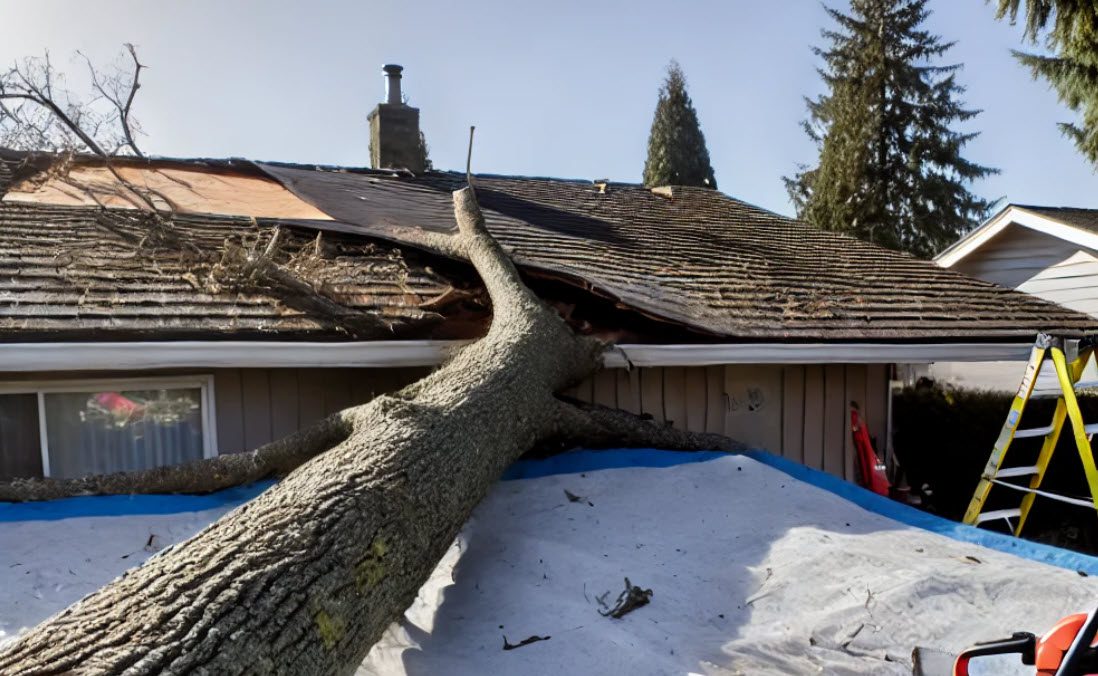
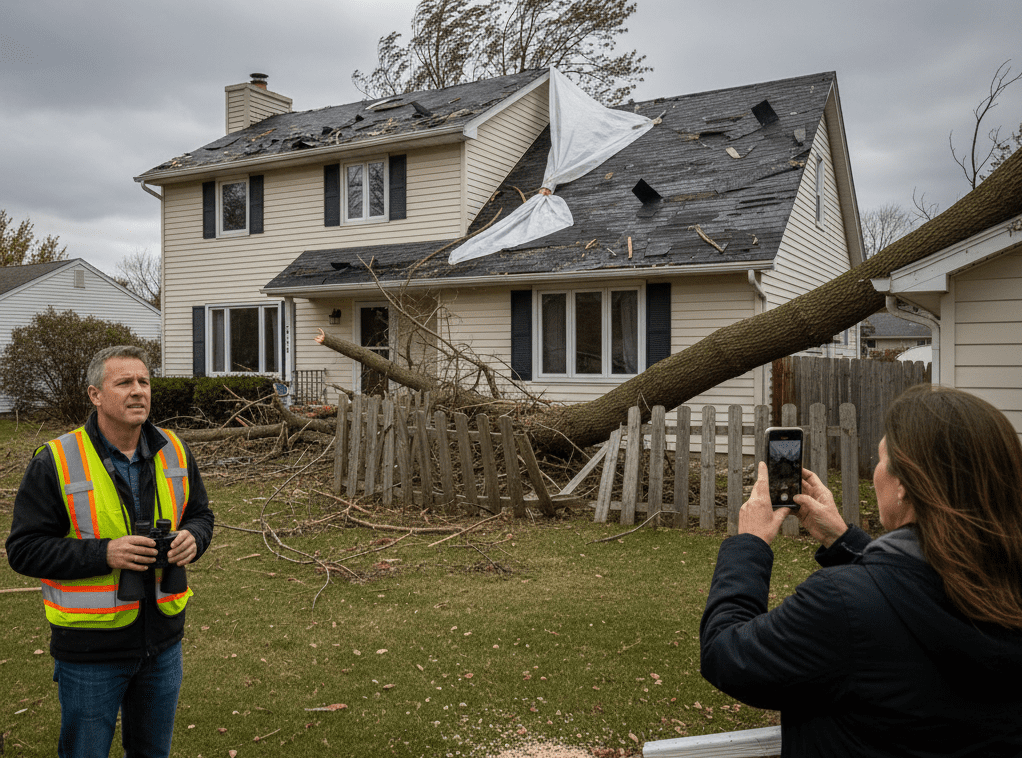
A Tree Just Fell On My Roof: What Are My Next Steps?
There’s nothing quite as unsettling as a tree crashing onto your roof. Whether it’s from one of our many Minnesota wind, rain, hail or snow storms or an unexpected fall, it can leave you feeling overwhelmed and unsure of what to do next. Having helped homeowners through similar situations, I wanted to provide a clear guide on the steps you should take immediately after a tree falls on your roof. Here’s what you need to know:
Step 1: Ensure Safety First
Before anything else, ensure everyone inside your home is safe. If the tree has caused structural damage, there’s a risk of further collapse, so evacuate the house if necessary. Do not attempt to inspect the damage yourself right away, especially if power lines are involved or the tree is large enough to affect multiple areas of your home.
Step 2: Contact Emergency Services (If Necessary)
If the tree has brought down power lines, there is immediate structural danger, or someone is injured, call 911. Electrical hazards and structural instability can be deadly, so always prioritize safety.
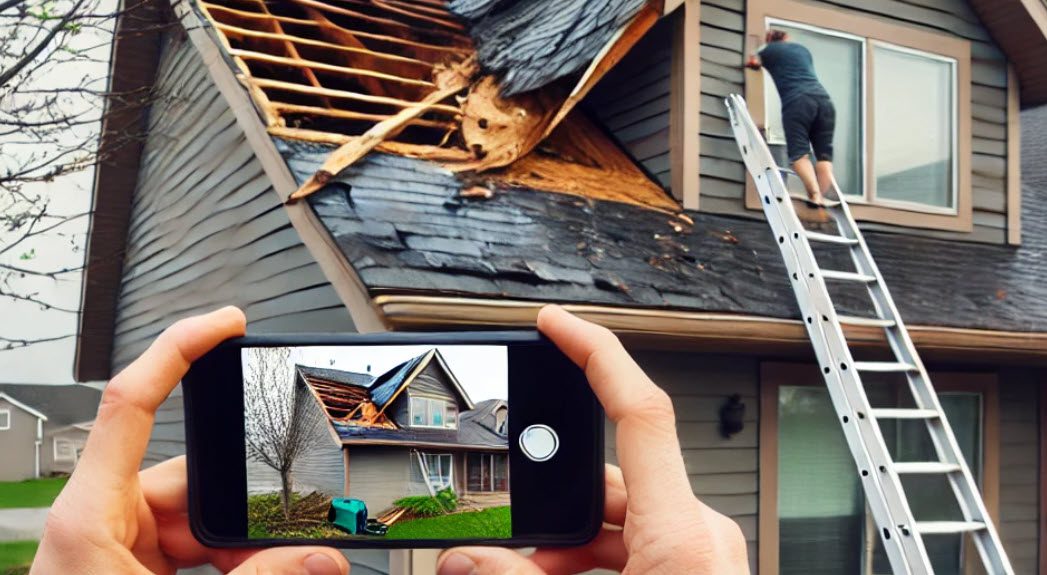
Step 3: Document the Damage!
Before any repairs begin, document the damage by taking photos and videos of the tree, the roof, and any additional parts of the house that may have been affected. This documentation will be essential when dealing with your insurance company.
Step 4: Contact a Trusted Roofing Company FIRST, Then Your Insurance Company
In our opinion, this is where many people go wrong. First you should contact a trusted roofing company before contacting the insurance company. Why? Because the roofing company will become your educated buffer to make sure that you get everything covered financially that you need to remove the tree and to fix the damage. Then, contact the insurance company to report the incident. Be prepared to provide them with the documentation and knowledge youve gained & gathered from the roofing company and follow their process for filing a claim. They will likely send an adjuster to assess the damage.
Step 5: Prevent Further Damage
If it’s safe, you’ll want to take immediate steps to prevent further damage. This might include covering the damaged area of your roof with a tarp to avoid water damage, especially if rain is expected. Most roofing companies, including ours at Right Now Roofing, can assist with temporary repairs while you wait for the insurance adjuster.
Step 6: Hire a Professional Roofing Company
Once you’ve spoken with your insurance company, it’s time to hire a professional roofing company to assess and repair the damage. At Right Now Roofing, we’ve handled countless cases like this, and we’ll work with your insurance adjuster to make sure the repairs are covered and done right. Our goal is to restore your roof and your peace of mind as quickly as possible.
Comparison Chart: Tree Damage vs. Other Common Roof Emergencies
| Type of Emergency | Immediate Action Required | Potential Roof Damage | Repair Time | Insurance Coverage |
|---|---|---|---|---|
| Tree Falling on Roof | Evacuate if unsafe, call a roofer | Structural, punctures, leaks | 1-3 weeks | Often covered |
| Hail Damage | Inspect, document, call roofer | Dents, cracks, missing shingles | 1-2 weeks | Covered if severe |
| Wind Damage | Check for loose shingles/debris | Missing shingles, leaks | 1-2 weeks | Often covered |
| Water Leaks | Prevent further water entry | Water damage to attic/ceiling | 1-2 weeks | Covered if sudden |
FAQs
1. Will my insurance cover tree damage to my roof?
Most homeowners’ insurance policies cover damage from fallen trees if the tree fell due to a covered peril (e.g., storm, wind). However, damage caused by lack of maintenance or negligence might not be covered.
2. How long will it take to repair my roof?
Repair times vary depending on the extent of the damage and the availability of materials, but typically it takes between 1 to 3 weeks for full roof restoration.
3. Do I need to remove the tree myself?
No, it’s essential to hire professionals to safely remove the tree. Trying to remove it yourself could cause more damage to your home or even personal injury.
4. Can you help with the insurance claim process?
Yes, at Right Now Roofing, we work closely with your insurance adjuster to make sure the claims process is smooth and that all necessary repairs are covered.
Maurice Campbell brings over 20 years of extensive experience in the roofing and siding industry to his role as co-owner of Right Now Roofing. Maurice began his career in roofing installation, where his technical skills and problem-solving abilities set him apart. His career progressed into project management, where he successfully managed complex roofing and siding projects, ensuring they were completed on time and within budget.
How Hail Damage Can Compromise Your Commercial Roof: What You Need to Know
Hailstorms can cause serious damage to commercial roofs, often in ways that aren’t immediately visible. Whether it’s a minor impact or significant structural damage, hail poses risks that, if left unaddressed, could cost building owners substantial sums in repairs and lost revenue due to downtime.
Understanding how hail can affect your roof is crucial for making informed decisions about inspections, repairs, and preventative measures. In this post, we will explore the different types of hail damage, the long-term risks, and why regular roof inspections after a hailstorm are vital for maintaining the integrity of your commercial building.
Understanding Hail and Its Impact on Commercial Roofs
Hail forms when updrafts in a storm carry rain droplets into extremely cold areas of the atmosphere, where they freeze and eventually fall to the ground. While smaller hailstones might only cause superficial damage, larger hailstones can compromise the structure of your commercial roof in significant ways. It’s not just about the visible dents and cracks—hail can damage the underlying structure of the roof, weakening its ability to protect your building from future weather events.
Common Types of Hail Damage on Commercial Roofs:
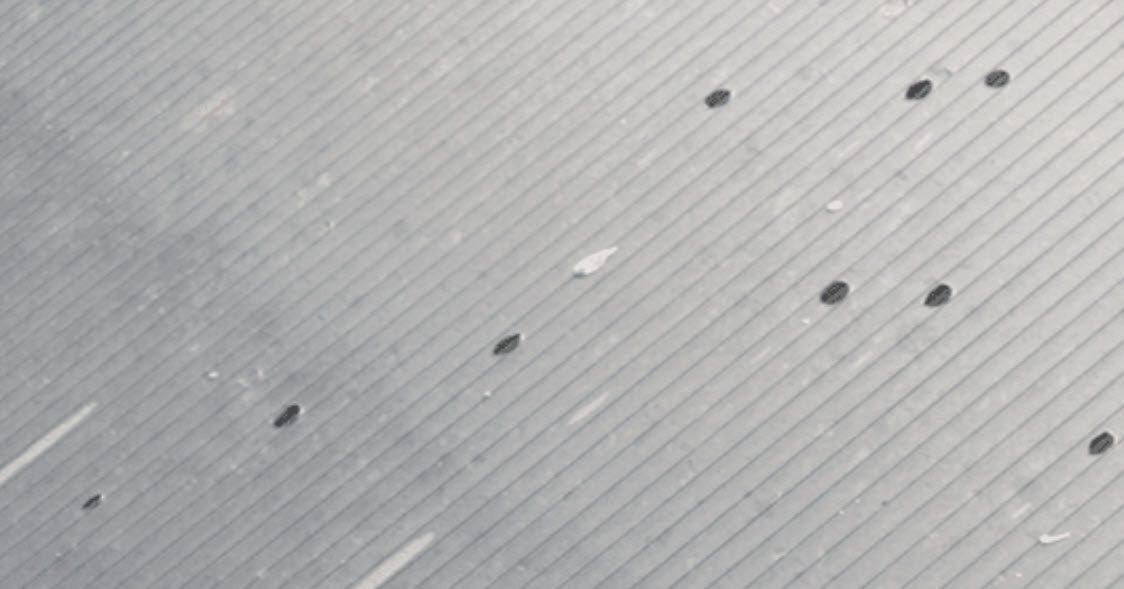
- Dents and Impact Marks: Hail often leaves visible dents or impact marks on roofing materials, especially on metal roofs. These dents can compromise the roof’s ability to effectively drain water, leading to ponding and eventual leaks.
- Punctures and Cracks: In cases of larger hailstones, the impact may cause punctures or cracks in the roofing membrane, which opens the door to water intrusion.
- Shingle Granule Loss: If your commercial roof uses asphalt shingles, hailstorms can knock off the protective granules, leaving the shingles more vulnerable to UV damage and reducing the overall lifespan of the roof.
- Membrane Damage: For flat or low-slope commercial roofs with rubber, TPO, or PVC membranes, hail can create punctures or tears, which may not be visible at first but can lead to serious water damage over time.
- Flashing Damage: Flashing around chimneys, vents, and other roof penetrations can also be damaged by hail, which can lead to water seeping into the building.
The Long-Term Risks of Ignoring Hail Damage
Ignoring hail damage can lead to a host of problems that extend far beyond the roof itself. Here are some of the most significant risks:
- Water Leaks and Mold Growth: Small cracks or punctures in the roof can allow water to infiltrate, leading to leaks. Over time, this moisture can promote mold growth, which poses health risks to building occupants and can require costly remediation.
- Structural Weakness: Hail damage can weaken the structural integrity of your roof. Over time, this may lead to sagging, collapse, or other severe issues that compromise the safety of your building.
- Energy Inefficiency: Hail damage to your roof can impact its insulation properties, making your building less energy efficient. This can lead to higher heating and cooling costs, putting a strain on your budget.
- Decreased Property Value: A damaged roof can significantly reduce the value of your commercial property, especially if potential buyers or tenants learn about the damage.
- Voided Warranties: Some roof warranties require regular maintenance and inspections, particularly after weather events like hailstorms. Failing to address damage promptly can void your warranty, leaving you on the hook for costly repairs.
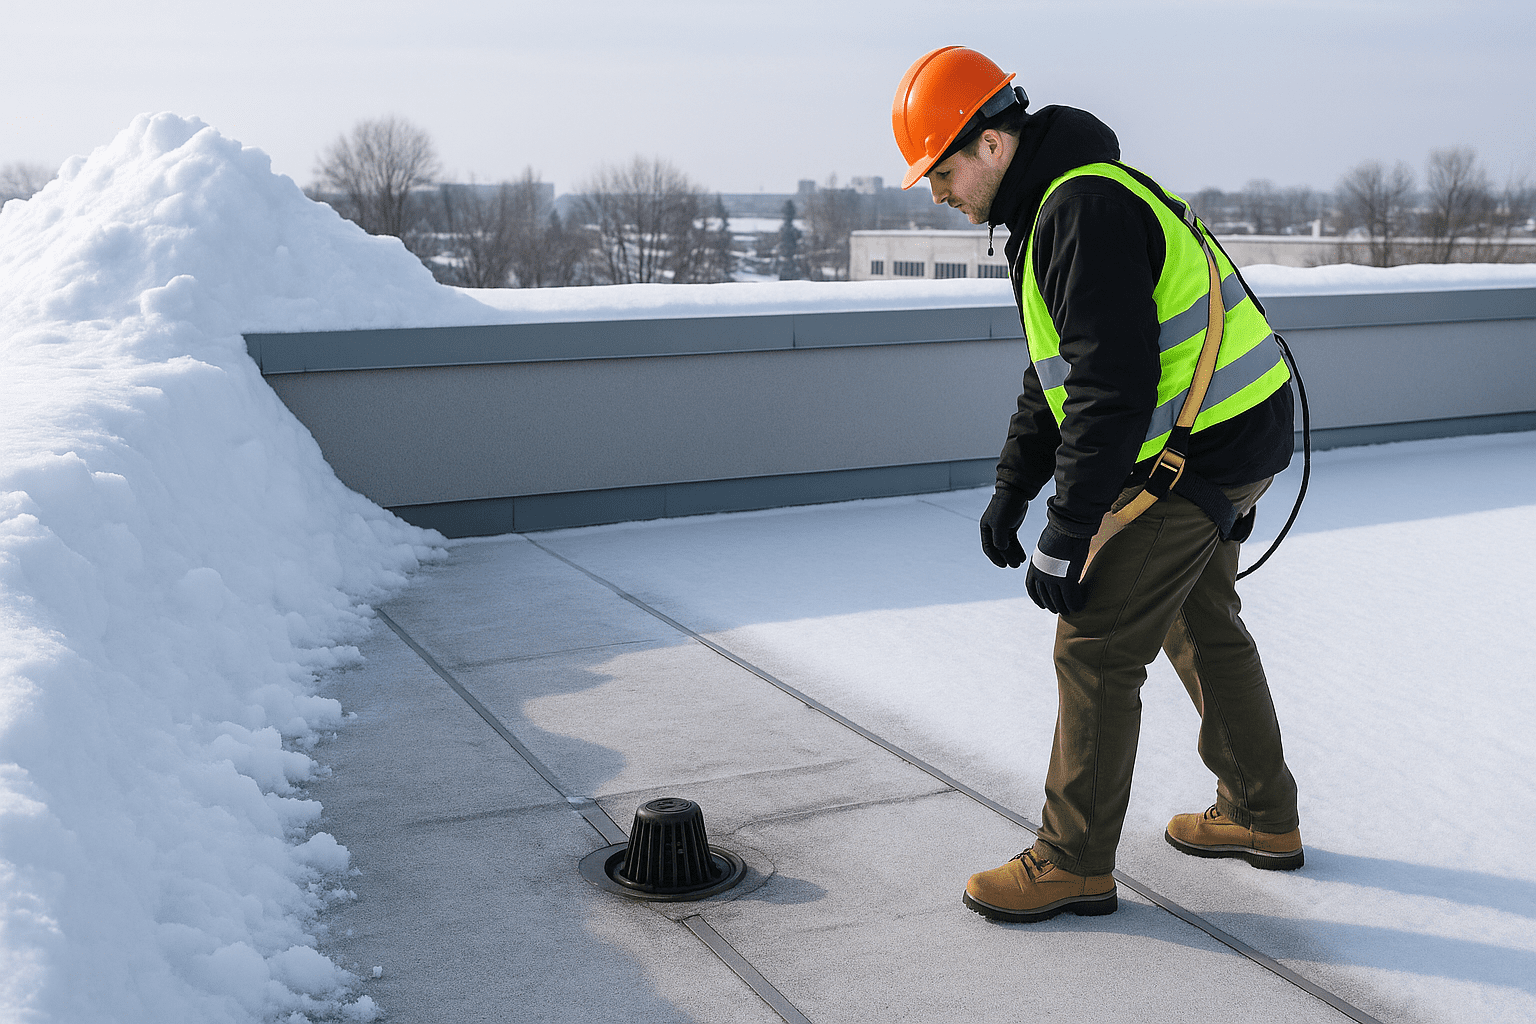
The Importance of Regular Roof Inspections
After a hailstorm, it’s essential to have a qualified roofing professional inspect your commercial roof, even if there doesn’t appear to be significant damage. Often, the most serious types of damage aren’t immediately visible to the untrained eye. A thorough inspection can identify small cracks, punctures, or membrane damage that could lead to more serious issues if left unaddressed.
In addition to post-storm inspections, it’s a good idea to schedule routine roof maintenance to catch potential problems early and ensure that your roof is in good shape before the next hailstorm hits. Many roofing companies offer maintenance programs that include regular inspections, which can extend the life of your roof and protect your investment.
Comparison of Hail Damage by Hailstone Size
Different sizes of hailstones cause different levels of damage. Here’s a comparison of typical roof damage based on hailstone diameter:
| Hailstone Size | Potential Roof Damage | Example Roofing Material |
|---|---|---|
| < 1 inch | Minimal damage; may cause dents in metal roofs and dislodge asphalt shingle granules | Metal, Asphalt Shingles |
| 1–1.5 inches | Moderate damage; likely to cause minor punctures, cracks in shingles, and damage to flashing | Asphalt Shingles, Single-Ply Membrane |
| 1.5–2 inches | Significant damage; can create punctures in flat roofing membranes and break shingles | EPDM, TPO, Metal, Shingles |
| > 2 inches | Severe damage; may cause structural roof damage, large punctures, broken tiles or shingles | All Roofing Types: Metal, EPDM, TPO, PVC, Shingles |
What to Do After a Hailstorm: Step-by-Step Guide for Building Owners
If your commercial building has been through a hailstorm, follow these steps to ensure your roof’s integrity and avoid long-term damage:
- Inspect the Surrounding Area: Before climbing onto the roof, inspect the ground around your building for signs of hail, such as damaged trees, vehicles, or outdoor equipment.
- Perform a Visual Roof Inspection: If it’s safe to do so, look for visible damage to your roof, such as dents, punctures, or granule loss. If your roof has a rubber or synthetic membrane, check for tears or punctures.
- Hire a Professional Roofing Contractor: Have a licensed roofing contractor perform a thorough inspection. They can identify more subtle types of damage and recommend necessary repairs.
- File an Insurance Claim: If your roof has been damaged by hail, contact your insurance company to file a claim. Make sure to document the damage with photos and inspection reports from your roofing contractor.
- Schedule Repairs: Depending on the extent of the damage, you may need to schedule immediate repairs or a complete roof replacement. Be sure to get quotes from several contractors and choose one with experience in hail damage repair.
- Plan for Future Storms: After your roof is repaired, consider investing in preventive measures to minimize future hail damage. This could include installing more durable roofing materials or reinforcing vulnerable areas of your roof.
Choosing the Right Roofing Materials for Hail-Prone Areas
If your commercial building is in a region prone to hailstorms, it’s essential to choose roofing materials that can withstand hail damage. Here are a few options to consider:
- Metal Roofing: Metal is one of the most hail-resistant roofing materials available. While hail may cause dents, it is less likely to puncture metal roofing than other materials.
- Impact-Resistant Shingles: Some manufacturers offer asphalt shingles that are designed to withstand hail impacts. These shingles have a reinforced layer that helps prevent granule loss and cracks.
- Single-Ply Membranes (TPO, EPDM, PVC): While single-ply membranes can be punctured by large hail, newer versions offer increased durability. For added protection, you can opt for a thicker membrane or reinforced seams.
- Clay or Concrete Tiles: These materials are highly resistant to hail, but they can crack under the impact of very large hailstones. However, they offer excellent protection in regions with moderate hailstorms.
Conclusion
Hail damage to commercial roofs is a serious concern that should not be ignored. From minor dents to major structural damage, hail can compromise your roof’s ability to protect your building and its contents. By understanding the different types of hail damage, recognizing the risks of ignoring it, and investing in regular roof inspections, you can prolong the life of your roof and avoid costly repairs in the future. If your commercial building has recently experienced a hailstorm, be sure to contact a roofing professional to assess the damage and recommend the best course of action.
Sources:
- National Roofing Contractors Association. “Hail Damage to Roof Systems.” NRCA.
- Insurance Institute for Business & Home Safety. “Hail: Understanding the Threat.” IBHS.
- Federal Emergency Management Agency. “Understanding Hail Damage to Roofing Systems.” FEMA.
Contact us today for our $299 Commercial Hail Inspection Special!
Justin Hansen is a seasoned professional in the roofing and siding industry, boasting over 15 years of hands-on experience. Starting his career in residential roofing, Justin quickly established a reputation for meticulous attention to detail and superior craftsmanship. His commitment to quality and excellence propelled him into more complex commercial projects, where he consistently delivered outstanding results.